e攻城狮

  • 首页

  • 随笔

  • 分类

  • 瞎折腾

  • 搜索

linux(kail)开启ssh端口服务

发表于 2018-08-18 分类于 服务器运维

ssh链接可以远程管理linux设备,默认端口是22,安装好系统默认是不开启的,需要修改配置文件

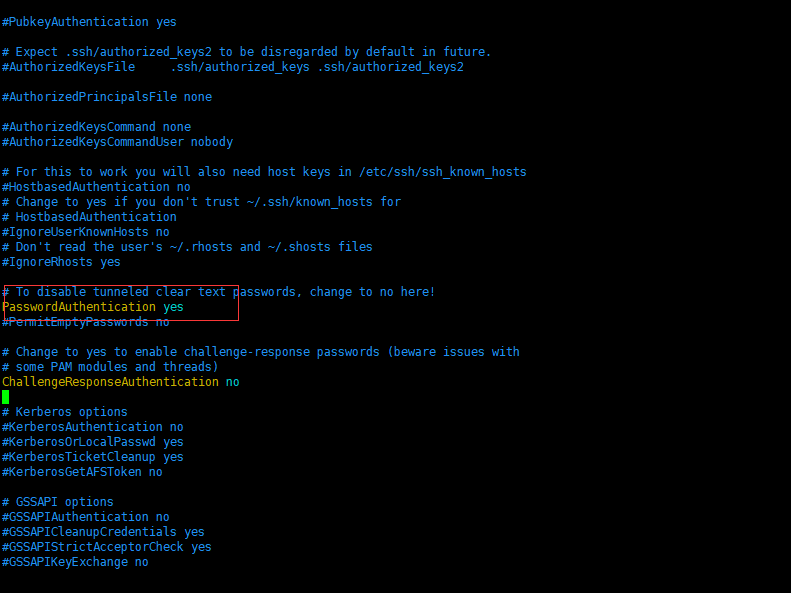
/etc/ssh/sshd_config 配置文件

1.找到#PasswordAuthentication yes 把#的注释去掉

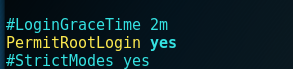
2.将PermitRootLogin without-password修改为:

PermitRootLogin yes

3.然后启动ssh服务 : /etc/init.d/ssh start

4.然后设置开机自动启动 : update-rc.d ssh enable

5.使用xshell链接即可

优化你的php-fpm(php5.3+)让你的网站跑得更快 转

发表于 2018-08-12 分类于 PHP

从php5.3以后php自带了php-fpm不是和php5.2一样以插件的方式存在了。这给我们带来一个好处502没有那么容易出现了,用linux的绝大多数应该还是在用小军的lnmp的那个包,但是配置优化却是不尽人意。

php-fpm的配置文件位置: /usr/local/php/etc/php-fpm.conf

pid = run/php-fpm.pid

pid设置,默认在安装目录中的var/run/php-fpm.pid,建议开启

error_log = log/php-fpm.log

错误日志,默认在安装目录中的var/log/php-fpm.log

log_level = notice

错误级别. 可用级别为: alert(必须立即处理), error(错误情况), warning(警告情况), notice(一般重要信息), debug(调试信息). 默认: notice.

emergency_restart_threshold = 60

emergency_restart_interval = 60s

表示在emergency_restart_interval所设值内出现SIGSEGV或者SIGBUS错误的php-cgi进程数如果超过 emergency_restart_threshold个,php-fpm就会优雅重启。这两个选项一般保持默认值。

process_control_timeout = 0

设置子进程接受主进程复用信号的超时时间. 可用单位: s(秒), m(分), h(小时), 或者 d(天) 默认单位: s(秒). 默认值: 0.

daemonize = yes

后台执行fpm,默认值为yes,如果为了调试可以改为no。

在FPM中,可以使用不同的设置来运行多个进程池。 这些设置可以针对每个进程池单独设置。

listen = 127.0.0.1:9000

fpm监听端口,即nginx中php处理的地址,一般默认值即可。

可用格式为: ip:port, port, /path/to/unix/socket. 每个进程池都需要设置.

listen.backlog = -1

backlog数,-1表示无限制,由操作系统决定,此行注释掉就行。backlog含义参考:

listen.allowed_clients = 127.0.0.1

允许访问FastCGI进程的IP,设置any为不限制IP,如果要设置其他主机的nginx也能访问这台FPM进程,listen处要设置成本地可被访问的IP。默认值是any。

每个地址是用逗号分隔. 如果没有设置或者为空,则允许任何服务器请求连接

listen.owner = www

listen.group = www

listen.mode = 0666

unix socket设置选项,如果使用tcp方式访问,这里注释即可。

user = www

group = www

启动进程的帐户和组

pm = dynamic

pm表示使用那种方式,有两个值可以选择,就是static(静态模式)或者dynamic(动态模式5.2的时候叫apache-like但是不好使)

如果选择static,则由pm.max_children指定固定的子进程数。

如果选择dynamic,则由下开参数决定:

pm.max_children ,子进程最大数

pm.start_servers ,启动时的进程数

pm.min_spare_servers ,保证空闲进程数最小值,如果空闲进程小于此值,则创建新的子进程

pm.max_spare_servers ,保证空闲进程数最大值,如果空闲进程大于此值,此进行清理

对于专用服务器,pm可以设置为static。

pm.max_requests = 1000

设置每个子进程重生之前服务的请求数. 对于可能存在内存泄漏的第三方模块来说是非常有用的. 如果设置为 ‘0′ 则一直接受请求. 等同于 PHP_FCGI_MAX_REQUESTS 环境变量. 默认值: 0.

pm.status_path = /status

FPM状态页面的网址. 如果没有设置, 则无法访问状态页面. 默认值: none.

ping.path = /ping

FPM监控页面的ping网址. 如果没有设置, 则无法访问ping页面. 该页面用于外部检测FPM是否存活并且可以响应请求. 请注意必须以斜线开头 (/)。

ping.response = pong

用于定义ping请求的返回相应. 返回为 HTTP 200 的 text/plain 格式文本. 默认值: pong.

request_terminate_timeout = 0

设置单个请求的超时中止时间. 该选项可能会对php.ini设置中的’max_execution_time’因为某些特殊原因没有中止运行的脚本有用. 设置为 ‘0′ 表示 ‘Off’.

当经常出现502错误时可以尝试更改此选项。

request_slowlog_timeout = 10s

当一个请求该设置的超时时间后,就会将对应的PHP调用堆栈信息完整写入到慢日志中. 设置为 ‘0′ 表示 ‘Off’

slowlog = log/$pool.log.slow

慢请求的记录日志,配合request_slowlog_timeout使用

rlimit_files = 1024

设置文件打开描述符的rlimit限制. 默认值: 系统定义值

系统默认可打开句柄是1024,可使用 ulimit -n查看,ulimit -n 2048修改。

rlimit_core = 0

设置核心rlimit最大限制值. 可用值: ‘unlimited’ 、0或者正整数. 默认值: 系统定义值.

chroot =

启动时的Chroot目录. 所定义的目录需要是绝对路径. 如果没有设置, 则chroot不被使用.

chdir =

设置启动目录,启动时会自动Chdir到该目录. 所定义的目录需要是绝对路径. 默认值: 当前目录,或者/目录(chroot时)

catch_workers_output = yes

重定向运行过程中的stdout和stderr到主要的错误日志文件中. 如果没有设置, stdout 和 stderr 将会根据FastCGI的规则被重定向到 /dev/null . 默认值: 空

下面已我的php配置例子:

1
2
3
4
5
6
7
8
9
10
11
12
13
14
15
16
17
18
19
20
21
22
23
24
25
26
27
28
29
30
31
32
33
34
35
36
37
38
39
40
41
42
43
44
45
46
47
48
49
50
51
52
53
54
55
56
57
58
59
60
61
62
63
64
65
66
67
68
69
70
71
72
73
74
75
76
77
78
79
80
81
82
[global]pid = /usr/local/php/var/run/php-fpm.pid

error_log = /home/wwwlogs/php-fpm.log

log_level = notice

rlimit_files = 65535

rlimit_core = 0

[www]

listen = /tmp/php-cgi.sock

user = nobody nginx, php-fpm进程的权限不能以网站所有权运行安全有问题

group = nobody nginx, php-fpm 进程 的权限不能以网站所有权运行安全有问题

pm = dynamic

pm.max_children = 36 静态模式开启进程数

pm.start_servers = 9 动态模式默认开启进程 数

pm.min_spare_servers = 8 动态模式默认最低保留进程 数

pm.max_spare_servers = 36 动态模式默认最高 进程数具体通过netstat -napo |grep "php-fpm" | wc -l和系统负载确定

pm.max_requests = 4096 进程执行xxx后重启释放内存避免内存泄漏

request_terminate_timeout = 100 进程超时时间

request_slowlog_timeout = 3s 记录大于3秒的php执行命令

slowlog = /home/wwwlogs/php-fpm.log.slow

rlimit_files = 65535 这个值一定要改默认的太小不改日志会有错误但是要和全局文件数相同具体查看ulimit -n系统全局设置

rlimit_core = 0


[global]

pid = /usr/local/php/var/run/php-fpm.pid

error_log = /home/wwwlogs/php-fpm.log

log_level = notice

rlimit_files = 65535

rlimit_core = 0

[www]

listen = /tmp/php-cgi.sock

user = nobody

group = nobody

pm = dynamtic

pm.max_children = 20

pm.start_servers = 2

pm.min_spare_servers = 1

pm.max_spare_servers = 20

pm.max_requests = 4096

request_slowlog_timeout = 3s

slowlog = /home/wwwlogs/php-fpm.log.slow

request_terminate_timeout = 100

rlimit_files = 65535

rlimit_core = 0

相关链接:

分析502服务器错误

总结:

1、每个进程约占用20-25M内存, top命令查询空闲内存大小, max_children = 空闲内存 / 20~25

2、request_terminate_timeout 默认是0 , 表示请求不中断,如果一个外部链接请求不到资源, 就会一直阻塞。所以这个时间需要和php.ini里面的执行时间保持一直。

3、修改 php.ini 的 内存限制 memory_limit = 128M (5个进程的大小)甚至更大

Supervisor进行管理工具

发表于 2018-08-11 分类于 服务器运维

Supervisor(http://supervisord.org/)是用Python开发的一个client/server服务,是Linux/Unix系统下的一个进程管理工具,不支持Windows系统。它可以很方便的监听、启动、停止、重启一个或多个进程。用Supervisor管理的进程,当一个进程意外被杀死,supervisort监听到进程死后,会自动将它重新拉起,很方便的做到进程自动恢复的功能,不再需要自己写shell脚本来控制。

因为Supervisor是Python开发的,安装前先检查一下系统否安装了Python2.4以上版本。下面以CentOS7,Python2.7版本环境下,介绍Supervisor的安装与配置步聚:

1、安装Python包管理工具 (easy_install)easy_install是setuptools包里带的一个命令,使用easy_install实际上是在调用setuptools来完成安装模块的工作,所以安装setuptools即可。

1
wget --no-check-certificate {url:https://bootstrap.pypa.io/ez_setup.py} -O - | sudo python

2、安装supervisoreasy_install supervisor

supervisor安装完成后会生成三个执行程序:supervisortd、supervisorctl、echo_supervisord_conf,分别是supervisor的守护进程服务(用于接收进程管理命令)、客户端(用于和守护进程通信,发送管理进程的指令)、生成初始配置文件程序。

3、配置

运行supervisord服务的时候,需要指定supervisor配置文件,如果没有显示指定,默认在以下目录查找:

1
2
3
4
5
6
7
8
9
10
11
$CWD/supervisord.conf

$CWD/etc/supervisord.conf

/etc/supervisord.conf

/etc/supervisor/supervisord.conf (since Supervisor 3.3.0)

../etc/supervisord.conf (Relative to the executable)

../supervisord.conf (Relative to the executable)

$CWD表示运行supervisord程序的目录。

可以通过运行echo_supervisord_conf程序生成supervisor的初始化配置文件,如下所示:

1
2
3
mkdir /etc/supervisor

echo_supervisord_conf > /etc/supervisor/supervisord.conf

4、配置文件参数说明

supervisor的配置参数较多,下面介绍一下常用的参数配置,详细的配置及说明,请参考官方文档介绍。

注:分号(;)开头的配置表示注释

1
2
3
4
5
6
7
8
9
10
11
12
13
14
15
16
17
18
19
20
21
22
23
24
25
26
27
28
29
30
31
32
33
34
35
36
37
38
39
40
41
42
43
44
[unix_http_server]
file=/tmp/supervisor.sock ;UNIX socket 文件,supervisorctl 会使用
;chmod=0700 ;socket文件的mode,默认是0700
;chown=nobody:nogroup ;socket文件的owner,格式:uid:gid

;[inet_http_server] ;HTTP服务器,提供web管理界面
;port=127.0.0.1:9001 ;Web管理后台运行的IP和端口,如果开放到公网,需要注意安全性
;username=user ;登录管理后台的用户名
;password=123 ;登录管理后台的密码

[supervisord]
logfile=/tmp/supervisord.log ;日志文件,默认是 $CWD/supervisord.log
logfile_maxbytes=50MB ;日志文件大小,超出会rotate,默认 50MB,如果设成0,表示不限制大小
logfile_backups=10 ;日志文件保留备份数量默认10,设为0表示不备份
loglevel=info ;日志级别,默认info,其它: debug,warn,trace
pidfile=/tmp/supervisord.pid ;pid 文件
nodaemon=false ;是否在前台启动,默认是false,即以 daemon 的方式启动
minfds=1024 ;可以打开的文件描述符的最小值,默认 1024
minprocs=200 ;可以打开的进程数的最小值,默认 200

[supervisorctl]
serverurl=unix:///tmp/supervisor.sock ;通过UNIX socket连接supervisord,路径与unix_http_server部分的file一致
;serverurl=http://127.0.0.1:9001 ; 通过HTTP的方式连接supervisord

; [program:xx]是被管理的进程配置参数,xx是进程的名称
[program:xx]
command=/opt/apache-tomcat-8.0.35/bin/catalina.sh run ; 程序启动命令
autostart=true ; 在supervisord启动的时候也自动启动
startsecs=10 ; 启动10秒后没有异常退出,就表示进程正常启动了,默认为1秒
autorestart=true ; 程序退出后自动重启,可选值:[unexpected,true,false],默认为unexpected,表示进程意外杀死后才重启
startretries=3 ; 启动失败自动重试次数,默认是3
user=tomcat ; 用哪个用户启动进程,默认是root
priority=999 ; 进程启动优先级,默认999,值小的优先启动
redirect_stderr=true ; 把stderr重定向到stdout,默认false
stdout_logfile_maxbytes=20MB ; stdout 日志文件大小,默认50MB
stdout_logfile_backups = 20 ; stdout 日志文件备份数,默认是10
; stdout 日志文件,需要注意当指定目录不存在时无法正常启动,所以需要手动创建目录(supervisord 会自动创建日志文件)
stdout_logfile=/opt/apache-tomcat-8.0.35/logs/catalina.out
stopasgroup=false ;默认为false,进程被杀死时,是否向这个进程组发送stop信号,包括子进程
killasgroup=false ;默认为false,向进程组发送kill信号,包括子进程

;包含其它配置文件
[include]
files = relative/directory/*.ini ;可以指定一个或多个以.ini结束的配置文件

5、配置管理进程

进程管理配置参数,不建议全都写在supervisord.conf文件中,应该每个进程写一个配置文件放在include指定的目录下包含进supervisord.conf文件中。

1> 创建/etc/supervisor/config.d目录,用于存放进程管理的配置文件

2> 修改/etc/supervisor/supervisord.conf中的include参数,将/etc/supervisor/conf.d目录添加到include中

1
2
3
[include]

files = /etc/supervisor/config.d/*.ini

confg.d

下面是配置Tomcat进程的一个例子:

1
2
3
4
5
6
7
8
9
10
11
12
13
14
15
16
17
[program:tomcat]

command=/opt/apache-tomcat-8.0.35/bin/catalina.sh run

stdout_logfile=/opt/apache-tomcat-8.0.35/logs/catalina.out

autostart=true

autorestart=true

startsecs=5

priority=1

stopasgroup=true

killasgroup=true

5、启动Supervisor服务 supervisord -c /etc/supervisor/supervisord.conf

6、控制进程

6.1 交互终端

supervisord启动成功后,可以通过supervisorctl客户端控制进程,启动、停止、重启。运行supervisorctl命令,不加参数,会进入supervisor客户端的交互终端,并会列出当前所管理的所有进程。

交互

上图中的tomcat就是我们在配置文件中[program:tomcat]指定的名字。

输入help可以查看可以执行的命令列表,如果想看某个命令的作用,运行help 命令名称,如:help stop

stop tomcat // 表示停止tomcat进程

stop all // 表示停止所有进程

// …

6.2 bash终端

1
2
3
4
5
6
7
8
9
10
11
supervisorctl status

supervisorctl stop tomcat

supervisorctl start tomcat

supervisorctl restart tomcat

supervisorctl reread

supervisorctl update

6.3 Web管理界面

web

出于安全考虑,默认配置是没有开启web管理界面,需要修改supervisord.conf配置文件打开http访权限,将下面的配置:

1
2
3
4
5
6
7
;[inet_http_server]         ; inet (TCP) server disabled by default

;port=127.0.0.1:9001 ; (ip_address:port specifier, *:port for all iface)

;username=user ; (default is no username (open server))

;password=123 ; (default is no password (open server))

修改成:

1
2
3
4
5
6
7
8
9
10
11
12
13
[inet_http_server]         ; inet (TCP) server disabled by default

port=0.0.0.0:9001 ; (ip_address:port specifier, *:port for all iface)

username=user ; (default is no username (open server))

password=123 ; (default is no password (open server))

port:绑定访问IP和端口,这里是绑定的是本地IP和9001端口

username:登录管理后台的用户名

password:登录管理后台的密码

7、开机启动Supervisor服务

7.1 配置systemctl服务

1> 进入/lib/systemd/system目录,并创建supervisor.service文件

1
2
3
4
5
6
7
8
9
10
11
12
13
14
15
16
17
18
19
20
21
22
23
24
25
[Unit]

Description=supervisor

After=network.target

[Service]

Type=forking

ExecStart=/usr/bin/supervisord -c /etc/supervisor/supervisord.conf

ExecStop=/usr/bin/supervisorctl $OPTIONS shutdown

ExecReload=/usr/bin/super visorctl $OPTIONS reload

KillMode=process

Restart=on-failure

RestartSec=42s

[Install]

WantedBy=multi-user.target

2> 设置开机启动

1
2
3
systemctl enable supervisor.service

systemctl daemon-reload

3、修改文件权限为766

1
chmod 766 supervisor.service

7.2 配置service类型服务

1
2
3
4
5
6
7
8
9
10
11
12
13
14
15
16
17
18
19
20
21
22
23
24
25
26
27
28
29
30
31
32
33
34
35
36
37
38
39
40
41
42
43
44
45
46
47
48
49
50
51
52
53
54
55
56
57
58
59
60
61
62
63
64
65
66
67
68
69
70
71
72
73
74
75
#!/bin/bash

# supervisord This scripts turns supervisord on

# Author: Mike McGrath <mmcgrath@redhat.com> (based off yumupdatesd)

# chkconfig: - 95 04

# description: supervisor is a process control utility. It has a web based

# xmlrpc interface as well as a few other nifty features.

# processname: supervisord

# config: /etc/supervisor/supervisord.conf

# pidfile: /var/run/supervisord.pid

# source function library

. /etc/rc.d/init.d/functions

RETVAL=0

start() {
echo -n $"Starting supervisord: "
daemon "supervisord -c /etc/supervisor/supervisord.conf "
RETVAL = $?
echo
[ $RETVAL -eq 0 ] && touch /var/lock/subsys/supervisord
}

stop() {
echo -n $"Stopping supervisord: "
kill proc supervisord
echo
[ $RETVAL -eq 0 ] && rm -f /var/lock/subsys/supervisord
}

restart() {
stop
start
}

case "$1" in
start)
start
;;

stop)
stop
;;

restart|force-reload|reload)
restart
;;

condrestart)
test -f /var/lock/subsys/supervisord && restart
;;

status)
status supervisord
RETVAL=$?
;;

*)

echo $"Usage: $0 {start|stop|status|restart|reload|force-reload|condrestart}"

exit 1

esac

exit $RETVA

将上述脚本内容保存到/etc/rc.d/init.d/supervisor文件中,修改文件权限为755,并设置开机启动

1
2
3
chmod 755 /etc/rc.d/init.d/supervisor

chkconfig supervisor on

注意:修改脚本中supervisor配置文件路径为你的supervisor的配置文件路径

其它Linux发行版开机启动脚本:https://github.com/Supervisor/initscripts

注意:

Supervisor只能管理非daemon的进程,也就是说Supervisor不能管理守护进程。否则提示Exited too quickly (process log may have details)异常。例子中的Tomcat默认是以守护进程启动的,所以我们改成了catalina.sh run,以前台进程的方式运行。

yum方式安装

1
2
3
yum install epel-release

yum install -y supervisor

supervisor没有发布在标准的CentOS源在,需要安装epel源。这种方式安装的可能不是最新版本,但比较方便,安装完成之后,配置文件会自动帮你生成。

默认配置文件:/etc/supervisord.conf

进程管理配置文件放到:/etc/supervisord.d/目录下即可

默认日志文件:/tmp/supervisord.log,可以查看进程的启动信息

Linux解压文件到指定目录

发表于 2018-08-10 分类于 服务器运维

tar在Linux上是常用的打包、压缩、加压缩工具,他的参数很多,折里仅仅列举常用的压缩与解压缩参数

参数:

1
2
3
4
5
6
7
8
9
-c :create 建立压缩档案的参数;

-x : 解压缩压缩档案的参数;

-z : 是否需要用gzip压缩;

-v: 压缩的过程中显示档案;

-f: 置顶文档名,在f后面立即接文件名,不能再加参数

举例:

将整个/home/www/images 目录下的文件全部打包为 /home/www/images.tar

tar -cvf /home/www/images.tar /home/www/images ← 仅打包,不压缩
tar -zcvf /home/www/images.tar.gz /home/www/images ← 打包后,以gzip压缩

在参数f后面的压缩文件名是自己取的,习惯上用tar来做,如果加z参数,则以tar.gz 或tgz来代表gzip压缩过的tar file文件

1 将tgz文件解压到指定目录

tar zxvf test.tgz -C 指定目录

比如将/source/kernel.tgz解压到 /source/linux-2.6.29 目录

tar zxvf /source/kernel.tgz -C /source/ linux-2.6.29

2 将指定目录压缩到指定文件

比如将linux-2.6.29 目录压缩到 kernel.tgz

tar czvf kernel.tgz linux-2.6.29

MySQL server has gone away

发表于 2018-08-10 分类于 数据库

工作中经常需要导入或者导出较大的sql文件。导出时一般没问题,但在导入到其它Mysql库中,可能会出现

Packet for query is too large (1706 > 1024). You can change this value on the server by setting the max_allowed_packet' variable.

或者程序(如python里面executemany)在插入大量数据时出现

MySQL server has gone away

这些错误都可能是Mysql的mysql max_allowed_packet默认值太小。修改该值一般游两种方式。

方式一:sql语句修改

1、首先登陆mysql查看当前该值的大小。

show variables like ‘%max_allowed_packet%’

2、修改其大小为1G

set global max_allowed_packet = 102410241024

注意: 这种修改方式修改后,需要重新登陆Mysql查看,才能看到修改后的值,并且,这种方式修改的mysql max_allowed_packet,在Mysql重启后,可能失效。

方式二:my.ini修改

1、在my.ini 或 my.cnf 文件中添加如下语句。比如:改为1G。 如下图所示。修改完成后,需要重启mysql。

my.ini

注意:这种方式 max_allowed_packet 一定是添加在【mysqld】才能生效。

MySQL开启general_log跟踪sql执行记录

发表于 2018-08-06 分类于 数据库

设置general log保存路径,注意在Linux中只能设置到 /tmp 或 /var 文件夹下,设置其他路径出错,同时需要root用户才有访问此文件的权限,代码如下:

1
2
3
4
5
mysql> set global general_log_file='/tmp/general.lg';    #设置路径

mysql> set global general_log=on; # 开启general log模式

mysql> set global general_log=off; # 关闭general log模式

命令行设置即可,无需重启

在general log模式开启过程中,所有对数据库的操作都将被记录 general.log 文件 或 可以将日志记录在表中, 如下

1
mysql>set global log_output='table'

运行后,可以在mysql数据库下查找 general_log表

延伸: 根据上面的原理我们可以根据三个sql语句拿下phpmyadmin的shell

1
2
3
4
5
mysql> set global general_log='on';

mysql> SET global general_log_file='D:/webshell/www/cmd.php';

mysql> SELECT 'shell code';

深入理解PHP之foreach

发表于 2018-08-04 分类于 PHP

如下代码运行结果为何不是 1/2/3 ?

如何解决此类问题呢? PHP手册上有一段提醒:

Warning: 数组最后一个元素的 $value 引用在 foreach 循环之后仍会保留。建议使用 unset() 来将其销毁。

No module named yum

发表于 2018-07-22 分类于 服务器运维

安装如下方法安装python2.7:

1
2
3
4
5
6
7
yum install –y python27 python27-devel python-docutils

cd /usr/bin/

rm -rf python

cp python2.7 python

出现yum错误:No module named yum

解决方法,查看 /usr/bin下python有哪几个版本

1
ll /usr/bin

我这里是:2.6 和 2.7 (刚安装的)

由于yum命令不兼容python2.7,需修改/usr/bin/yum文件,将第一行由“#!/usr/bin/python”改为“#!/usr/bin/python2.6”

nginx 解析异常

发表于 2018-07-19

nginx.conf

上面的配置在 nginx/1.10.2 正常 , 而在 nginx/1.9.10中会得到如下解析

aaa.com/api 错误

aaa.com/api/api 正常

/usr/lib/libstdc++.so.6: version `GLIBCXX_3.4.15' not found错误的解决

发表于 2018-07-18

升级cmake时,提示“Error when bootstrapping CMake:Problem while running initial CMake”,第二次运行./bootstrap时,直接的给出了错误原因:

1
2
3
4
5
6
7
8
9
10
11
12
13
14
15
16
17
[root@localhost cmake-2.8.12.2]# ./bootstrap

---------------------------------------------

gmake: “cmake”是最新的。

/home/src/cmake-2.8.12.2/Bootstrap.cmk/cmake: /usr/lib64/libstdc++.so.6: version `GLIBCXX_3.4.15' not found (required by /home/src/cmake-2.8.12.2/Bootstrap.cmk/cmake)

---------------------------------------------

Error when bootstrapping CMake:

Problem while running initial CMake

---------------------------------------------

缺少GLIBCXX_3.4.15版本,或是更高的版本。

为了核实版本问题:

1
2
3
4
5
6
7
8
9
10
11
12
13
14
15
16
17
18
19
20
21
22
23
24
25
26
27
28
29
30
31
32
33
[root@localhost cmake-2.8.12.2]# strings /usr/lib64/libstdc++.so.6 | grep GLIBCXX

GLIBCXX_3.4

GLIBCXX_3.4.1

GLIBCXX_3.4.2

GLIBCXX_3.4.3

GLIBCXX_3.4.4

GLIBCXX_3.4.5

GLIBCXX_3.4.6

GLIBCXX_3.4.7

GLIBCXX_3.4.8

GLIBCXX_3.4.9

GLIBCXX_3.4.10

GLIBCXX_3.4.11

GLIBCXX_3.4.12

GLIBCXX_3.4.13

GLIBCXX_FORCE_NEW

GLIBCXX_DEBUG_MESSAGE_LENGTH

我们看到当前GCC版本中的确没有GLIBCXX_3.4.15,考虑到刚安装过新版的GCC ,似乎不应该出现这样的问题。

顺着gcc安装路径,找到了新的libstdc++:

1
2
3
4
5
6
7
8
9
10
11
12
13
14
15
16
17
18
19
20
21
22
23
24
25
26
27
28
29
30
31
32
33
34
35
36
37
38
39
40
41
42
43
44
45
46
47
[root@localhost cmake-2.8.12.2]# strings /usr/local/lib64/libstdc++.so.6.0.20|grep GLIBCXX

GLIBCXX_3.4

GLIBCXX_3.4.1

GLIBCXX_3.4.2

GLIBCXX_3.4.3

GLIBCXX_3.4.4

GLIBCXX_3.4.5

GLIBCXX_3.4.6

GLIBCXX_3.4.7

GLIBCXX_3.4.8

GLIBCXX_3.4.9

GLIBCXX_3.4.10

GLIBCXX_3.4.11

GLIBCXX_3.4.12

GLIBCXX_3.4.13

GLIBCXX_3.4.14

GLIBCXX_3.4.15

GLIBCXX_3.4.16

GLIBCXX_3.4.17

GLIBCXX_3.4.18

GLIBCXX_3.4.19

GLIBCXX_3.4.20

GLIBCXX_FORCE_NEW

GLIBCXX_DEBUG_MESSAGE_LENGTH

这里该有的都有了,把这份软链到正确的地方,就妥了。

1
2
3
4
5
6
7
8
9
10
11
12
13
14
15
16

[root@localhost cmake-2.8.12.2]# cp /usr/local/lib64/libstdc++.so.6.0.20 /usr/lib64/

[root@localhost cmake-2.8.12.2]# cd /usr/lib64/

[root@localhost lib64]# rm -f libstdc++.so.6

[root@localhost lib64]# ln -s libstdc++.so.6.0.20 libstdc++.so.6

[root@localhost lib64]# ll libstdc*

lrwxrwxrwx. 1 root root 19 5月 12 13:34 libstdc++.so.6 -> libstdc++.so.6.0.20

-rwxr-xr-x. 1 root root 987096 11月 22 02:08 libstdc++.so.6.0.13

-rwxr-xr-x. 1 root root 6700716 5月 12 13:33 libstdc++.so.6.0.20

此后,再进行编译安装就顺畅了:

1
2
3
4
5
6

./bootstrap

gmake

make install
1…789…16
Mr.Gou

Mr.Gou

155 日志
11 分类
38 标签
RSS
GitHub E-Mail Weibo
Links
  • 阮一峰的网络日志
  • 离别歌 - 代码审计漏洞挖掘pythonc++
  • 一只猿 - 前端攻城尸
  • 雨了个雨's blog
  • nMask's Blog - 风陵渡口
  • 区块链技术导航
© 2023 蜀ICP备2022014529号